Welcome to the complete user manual for Artifex Terra 3D. This guide will walk you through all aspects of the program, from interface basics and tool usage to integration with other software. Whether you’re a beginner or an experienced user, this manual provides valuable insights to help you make the most of Artifex Terra 3D.
Table of Contents
- Getting Started
- Introduction to Artifex Terra 3D
- System Requirements
- Installation and Setup
- Interface Overview
- Main Toolbar
- Workspace Layout
- Customization Options
- Core Tools and Functions
- Terrain Sculpting Tools
- Texture Painting
- Color Layering
- Lighting and Shadow Controls
- Advanced Features
- Brush Customization
- Object Placement and Model Packs
- Real-Time Animation
- Normal Mapping and Texturing
- Exporting and Integration
- Exporting Projects
- Integration with Ogre3D and Other Engines
- Supported File Formats
- Tips and Best Practices
- Optimizing Performance
- Common Mistakes to Avoid
- Time-Saving Shortcuts
- FAQ and Troubleshooting
- Frequently Asked Questions
- Troubleshooting Common Issues
1. Getting Started
Introduction to Artifex Terra 3D
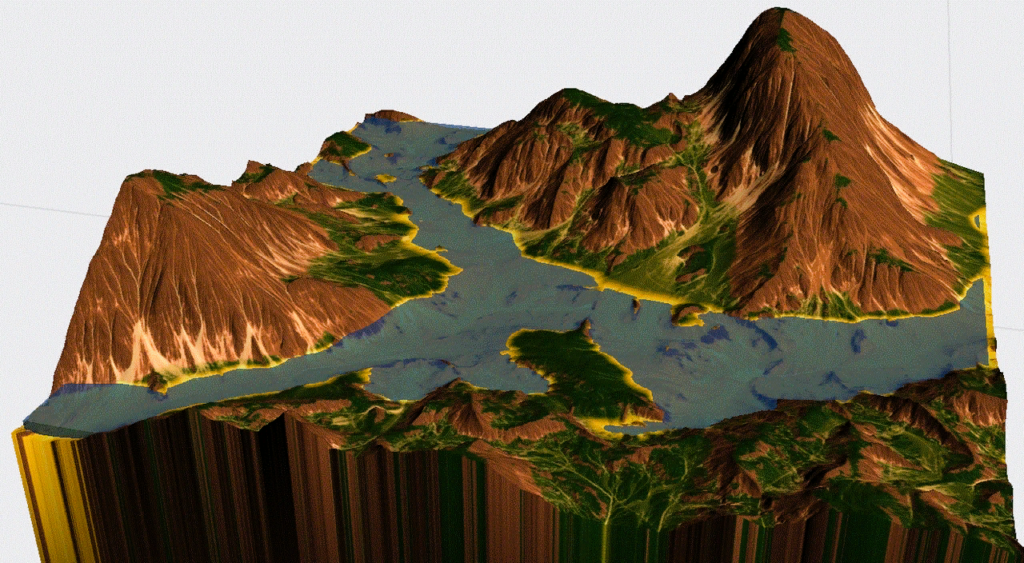
Artifex Terra 3D is a terrain editor for creating realistic 3D landscapes with intuitive, brush-based tools. Designed for game developers, artists, and architects, the program allows for quick and detailed environment creation.
System Requirements
For optimal performance, Artifex Terra 3D requires:
- OS: Windows 10 (64-bit recommended)
- Processor: Intel i5 or equivalent
- RAM: 8GB minimum, 16GB recommended
- Graphics Card: DirectX 11 compatible
- Storage: 1GB free space for installation
Installation and Setup
Download the installer from our Downloads page and follow the setup wizard. Once installed, launch Artifex Terra 3D and begin your journey by exploring the interface and basic tools.
2. Interface Overview
Main Toolbar
The main toolbar provides quick access to essential tools like sculpting, painting, lighting, and exporting. Hover over each icon for a tooltip with a brief description of the tool’s function.
Workspace Layout
The default workspace includes the 3D viewport, layer control panel, and properties sidebar. Each panel can be customized to fit your workflow needs.
Customization Options
Under the Settings menu, users can adjust preferences like brush sensitivity, display settings, and performance optimization to enhance the editing experience.
3. Core Tools and Functions
Terrain Sculpting Tools
- Raise and Lower: Adjust terrain height with precision.
- Flatten and Smooth: Create even surfaces and smooth transitions.
- Special Brushes (Boil, Flatblur, etc.): Add unique details to enhance realism.
Example usage tips: Use the “Smooth” tool after raising terrain to achieve a more natural look.
Texture Painting
- Splatting with Multi-Texture Layers: Blend up to 9 textures per terrain for varied surface detail.
- Triplanar Texturing: Helps reduce distortion, especially on steep surfaces.
Pro Tip: Experiment with triplanar texturing on rugged terrains to achieve realistic results.
Color Layering
Add depth with 8 color layers to control highlights, shadows, and ambient effects. Each layer can be edited individually or merged.
Lighting and Shadow Controls
Adjust lighting to simulate different times of day or weather conditions. The dynamic light source option allows you to preview shadows and reflections in real-time.
4. Advanced Features
Brush Customization
Create custom brushes tailored to your project needs. Modify size, intensity, and shape directly in the Brush Panel for precise control.
Object Placement and Model Packs
Choose from a wide range of trees, rocks, buildings, and more. Objects can be placed manually or randomly across the terrain, using density controls for natural-looking distribution.
Real-Time Animation
- Animated Mesh Grass: Add dynamic elements like moving grass.
- Lighting Effects: Make scenes more immersive with animated lighting changes.
Normal Mapping and Texturing
Artifex Terra 3D includes normal mapping for detailed textures and surface variations, enhancing realism without impacting performance.
5. Exporting and Integration

Exporting Projects
Save projects in formats compatible with popular 3D engines. Choose from multiple resolutions and texture qualities depending on your final output needs.
Integration with Ogre3D and Other Engines
The Ogre3D scene loader class is open-source, allowing seamless integration into Ogre3D-based projects. C++ support also ensures compatibility with custom applications.
Supported File Formats
Artifex Terra 3D supports a range of formats for assets and terrain files, including .obj, .fbx, .png, and .jpg.
6. Tips and Best Practices
- Optimize Brush Settings: Adjust brush sensitivity for different terrain types.
- Avoid Overlapping Textures: Use splatting carefully to prevent texture overload.
- Use Layers Wisely: Color layers can make terrain pop without excessive texturing.
7. FAQ and Troubleshooting
Q: What should I do if Artifex Terra 3D runs slowly?
A: Check your system performance settings, lower texture resolution, or close background programs to free up resources.
Q: Can I import my own textures?
A: Yes, you can import custom textures and use them with the texture painting tools.
For additional help, visit our Support page or consult the community forum.